If you’ve been looking for a way to truly unlock your Amazon Firestick, you’ve landed in exactly the right place. The stock Fire TV experience is fine — but it’s just the beginning. Add Kodi to the mix, and your $50 Firestick transforms into a full-blown home entertainment powerhouse.
Kodi is a free, open-source media center that gives you complete control over what you watch, when you watch it, and how it looks. We’re talking movies, TV shows, live sports, music, personal media libraries — all organized into one sleek, customizable interface. And with the latest release, Kodi 21.3 Omega, it’s never been faster, smoother, or more feature-rich.
We’ve designed this guide to be the most comprehensive Kodi installation resource you’ll find in 2026. We don’t just walk you through the basic setup — we cover advanced integrations like Real-Debrid and Trakt, pro-level maintenance tips to keep your Firestick snappy, the best Kodi builds and addons available right now, and a full troubleshooting section for when things go sideways.
Whether you’re a first-timer or you’ve been running Kodi for years and want to start fresh on the latest version, this guide has you covered from start to finish. Let’s get into it.
Why Kodi is the #1 App for Firestick Users
Before we get into the technical side, it’s worth understanding exactly why Kodi has maintained its position as the go-to app for Firestick enthusiasts. Here’s what makes it stand out from every other streaming option on the market:
1. Unmatched Versatility
Unlike single-purpose apps such as Netflix or Disney+, Kodi is essentially a blank canvas. Through community-developed add-ons, you can access content from virtually any corner of the internet. It supports nearly every file format imaginable — from MKV and MP4 for video to FLAC and OGG for high-fidelity audio.
2. 100% Free and Open-Source
While premium streaming services keep hiking their monthly prices, Kodi remains completely free. There’s no subscription, no paywall, and no premium tier. By pairing it with legal, free-to-use add-ons or your own personal media collection, you can slash your monthly entertainment bills significantly.
3. Complete Customization
Kodi lets you change its entire look and feel through “Skins.” You can make your Firestick’s interface look like a high-end home theater system, a dead-ringer for Netflix, or a futuristic dashboard. No other streaming app gives you this level of control.
4. Advanced Features for Power Users
Kodi 21.3 Omega brings professional-grade features to your Firestick hardware, including:
- Enhanced HDR10+ and Dolby Vision support for stunning visual clarity
- AV1 Video Decoding for high-quality streaming at lower bandwidths
- Improved Audio Passthrough for immersive surround sound setups
- Faster Video Library Rescans — significantly quicker content management
- Centralized Media Library — organize all your videos, music, and photos in one place
Understanding Kodi 21.3 Omega: What’s New?
Kodi 21.3, codenamed “Omega,” is the latest stable release, and it’s a meaningful upgrade over previous versions. Here are the headline improvements worth knowing about before you install:
- Improved HDR Support: Improved HDR Support: Enhanced HDR playback translates to better visual quality on compatible TVs and Firestick devices
- Faster Video Library Rescans: Faster Video Library Rescans: Significant speed improvements when scanning and updating your content library
- Bug Fixes and Stability: Bug Fixes and Stability: Numerous under-the-hood fixes leading to a more stable, reliable streaming experience
- Enhanced Audio Passthrough: Enhanced Audio Passthrough: Better support for various audio formats, ensuring a more immersive sound experience
- AV1 Decoding Support: AV1 Decoding Support: Efficient codec support allowing higher quality video at reduced file sizes
These improvements make Kodi 21.3 Omega the most refined and capable version yet — and the one we’d recommend for any Firestick user in 2026.
Pre-Installation Checklist
Before we dive into the installation steps, let’s make sure your Firestick is fully prepared. Running through this checklist first will save you headaches later:
- Enable Apps from Unknown Sources: Kodi isn’t available on the Amazon App Store, so your Firestick needs permission to install third-party apps. We’ll cover this in detail in the steps below.
- Install the Downloader App: This is the tool we’ll use to sideload Kodi onto your device. It acts as both a browser and file manager, making the process straightforward.
- Check Your Storage: Kodi and its add-ons can eat up storage fast, especially as thumbnail caches grow. If your Firestick is already packed, clear some space before starting.
- Connect a VPN (Strongly Recommended) — A VPN encrypts your traffic and protects your privacy when streaming through third-party add-ons. We’ll explain exactly why this matters later in the guide.
- Ensure a Stable Internet Connection — You’ll need a decent connection to download the Kodi APK. A buffering download mid-install is never fun.
💡 Pro Tip: If your Firestick hasn’t been updated recently, go to Settings > My Fire TV > About > Check for Updates before starting. Running the latest Fire OS ensures maximum compatibility with Kodi.
Step-by-Step Installation Guide
We’ll be using the Downloader app to sideload Kodi — this is the cleanest, most reliable method available. Follow each step carefully and you’ll have Kodi 21.3 Omega running in under 10 minutes.
Part 1: Enabling Developer Options
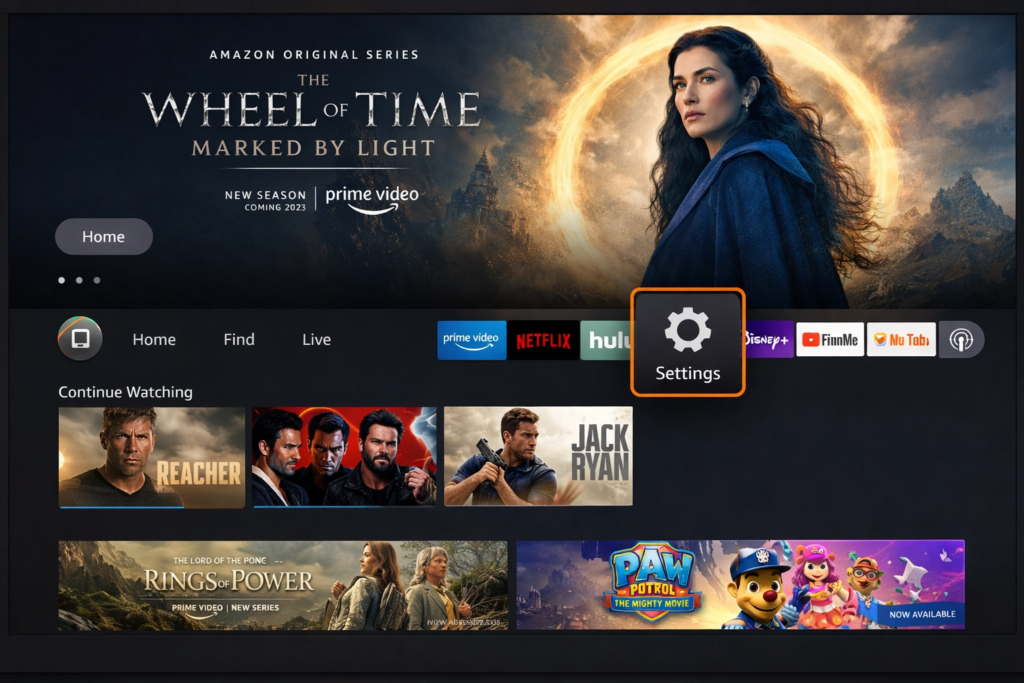
Step 1: Access Firestick Settings
Power on your Firestick and get to the home screen. Using your remote, scroll to the far right until you see the Settings icon (it looks like a gear). Select it.
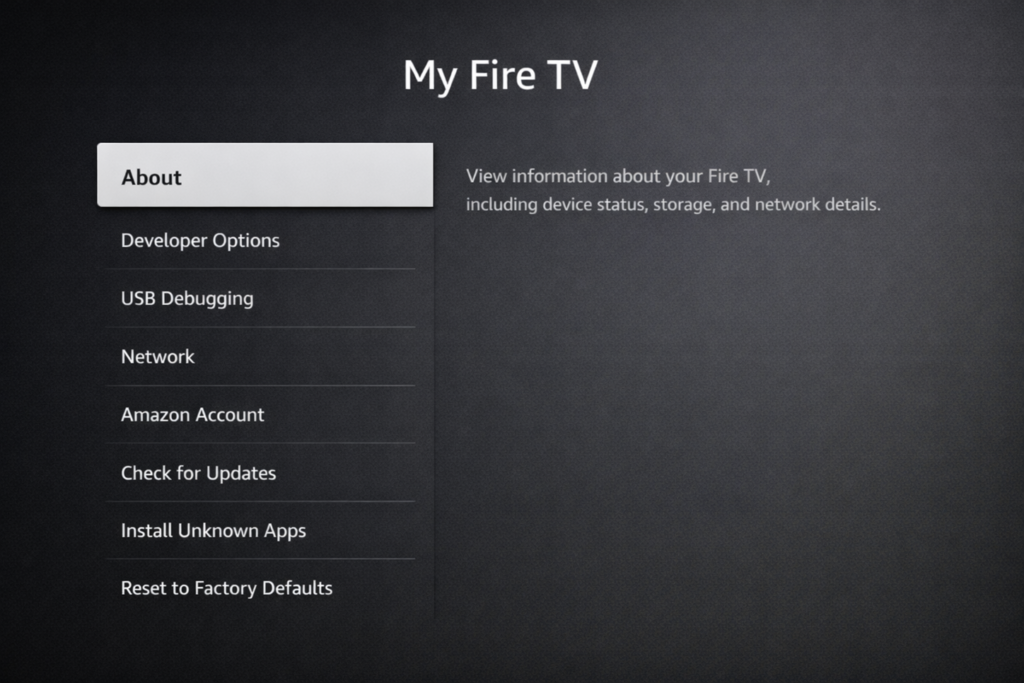
Step 2: Navigate to My Fire TV
Inside Settings, scroll down and select My Fire TV. This is where all the core system settings and developer tools live. This is the section Amazon doesn’t exactly advertise — but it’s essential for what we’re doing.
Step 3: Unlock Developer Options (The 7-Click Trick)
In newer versions of Fire OS, Amazon hides the Developer Options by default. Here’s how to reveal them — it’s oddly satisfying:
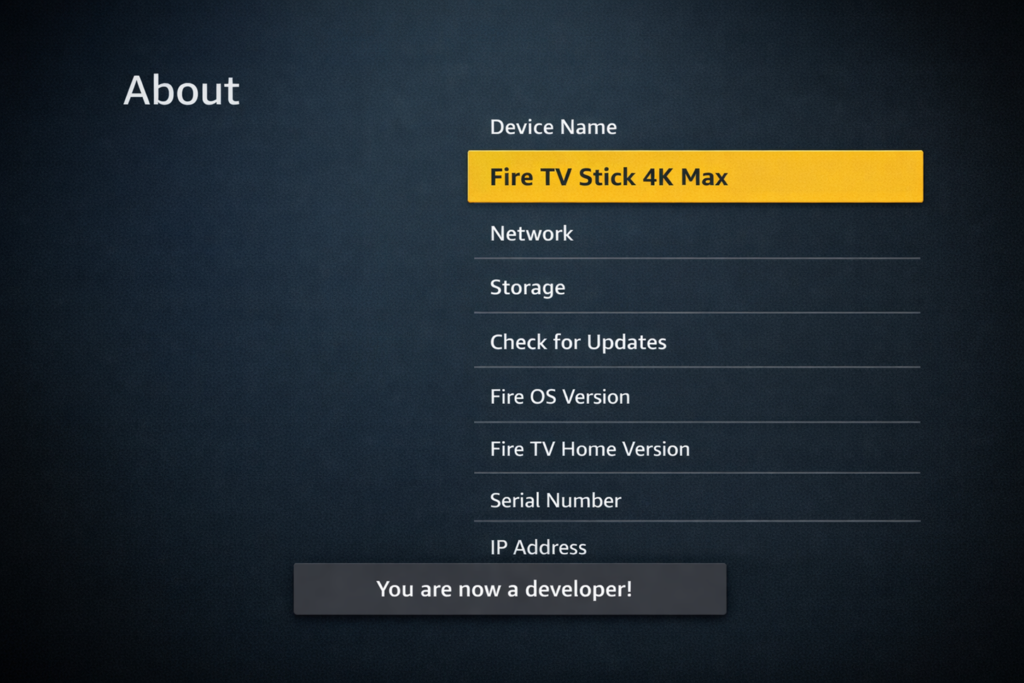
- Select About from the My Fire TV menu.
- Highlight your device name (e.g., Fire TV Stick 4K Max).
- Rapidly press the Select button on your remote 7 times.
- You’ll see a toast notification at the bottom of your screen: “You are now a developer!”
Step 4: Enable Unknown Sources
Now that Developer Options is unlocked, go back one screen to My Fire TV. You’ll see it listed as a new option. Open it and do the following:
- Turn ADB Debugging to ON.
- Select Install Unknown Apps (also listed as Apps from Unknown Sources on older Fire OS versions).
- Toggle it to ON.
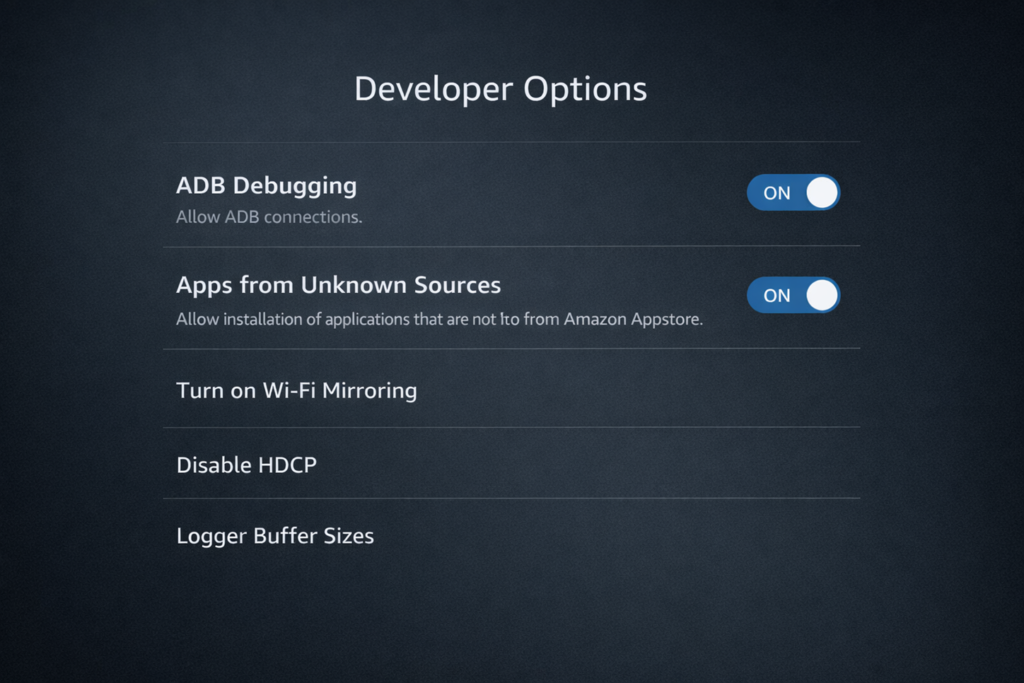
⚠️ Warning: You can disable these settings again after installing Kodi if you want to tighten up your Firestick’s security. We recommend leaving them on only while sideloading apps.
Part 2: Installing the Downloader App
Step 5: Search for Downloader
Head back to the Firestick Home Screen and select the Find menu, then click Search. Using the on-screen keyboard, type “Downloader” — make sure you’re selecting the official app with the orange icon from Amazon Apps.
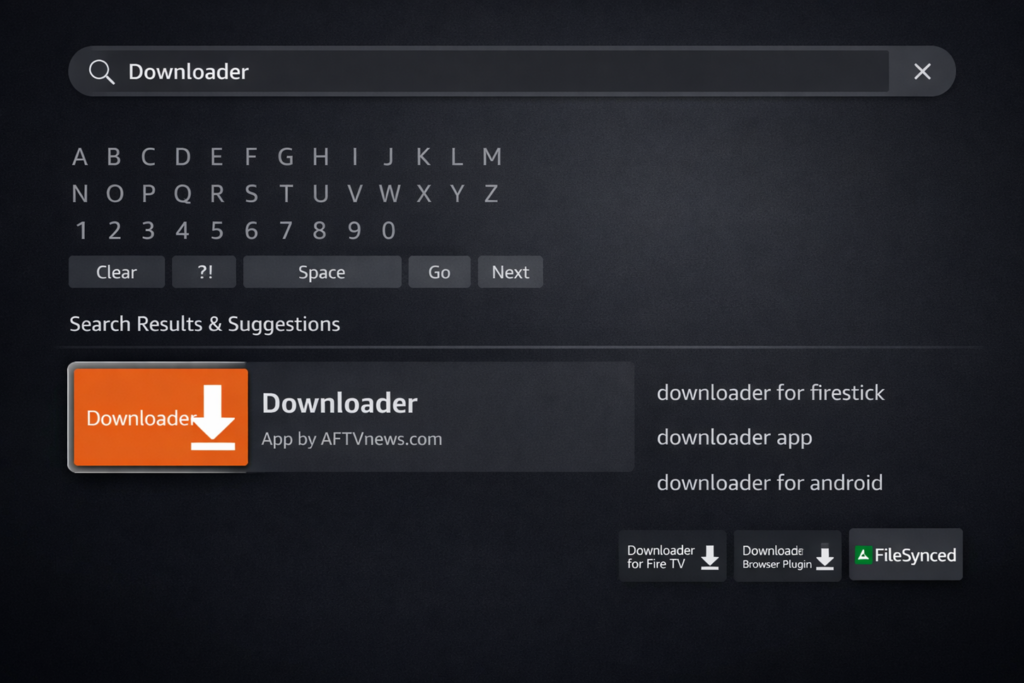
Step 6: Install and Launch Downloader
Select the Downloader app with the orange icon from the search results. Click Download or Get to install it. Once installed, click Open to launch it for the first time.
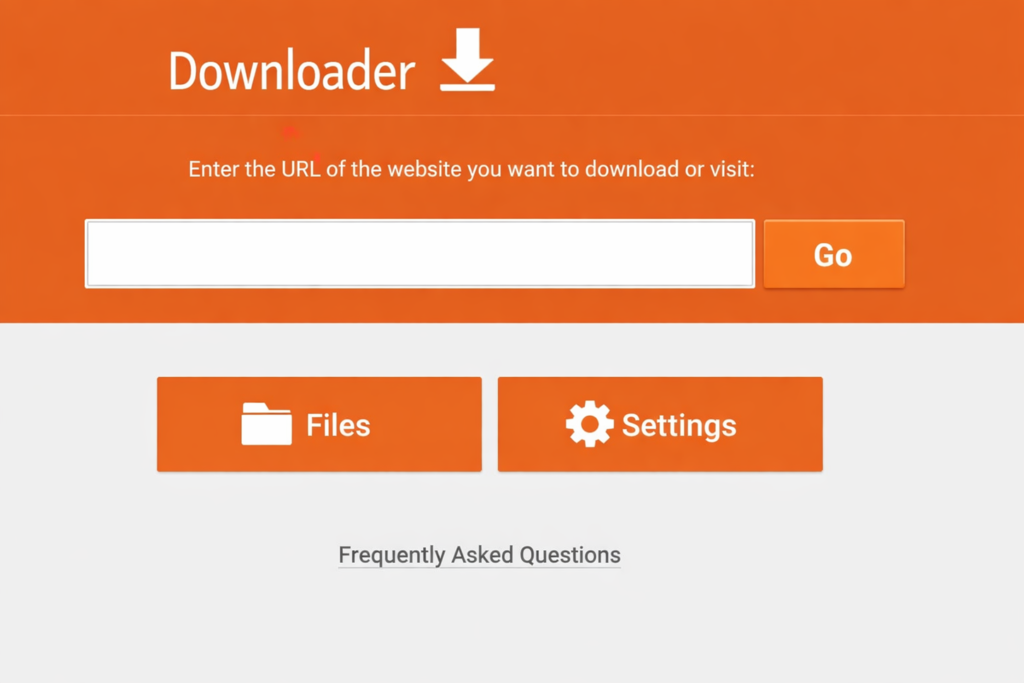
When the app asks for file permission on first launch, click Allow. This is essential — without it, the app can’t save the Kodi installer to your storage.
Part 3: Downloading and Installing Kodi 21.3 Omega
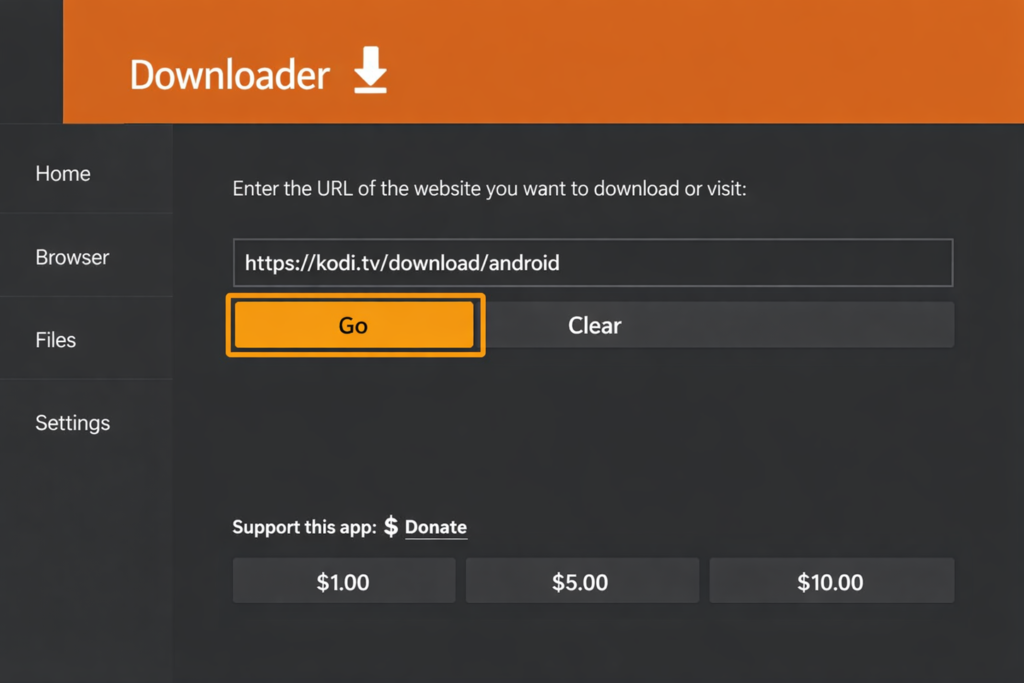
Step 7: Enter the Official Kodi Download URL
In the main URL box of the Downloader app, type the following address exactly: https://kodi.tv/download/android
Using the official Kodi website ensures you always download the most secure, up-to-date version. Click Go to proceed.
Step 8: Select the Correct Version for Your Device
On the Kodi download page, scroll down and select the Android icon. You’ll see several download options. Here’s how to pick the right one:
- Firestick 4K, 4K Max, 4K Plus, or Lite (2nd Gen+): Select ARMV8A (64-BIT) — this is the right choice for the vast majority of modern Firesticks.
- Very old Firestick (1st Gen): Select ARMV7A (32-BIT).
💡 Pro Tip: Not sure which Firestick you have? Go to Settings > My Fire TV > About. The device name and Fire OS version will be listed there.
Step 9: Download and Install Kodi
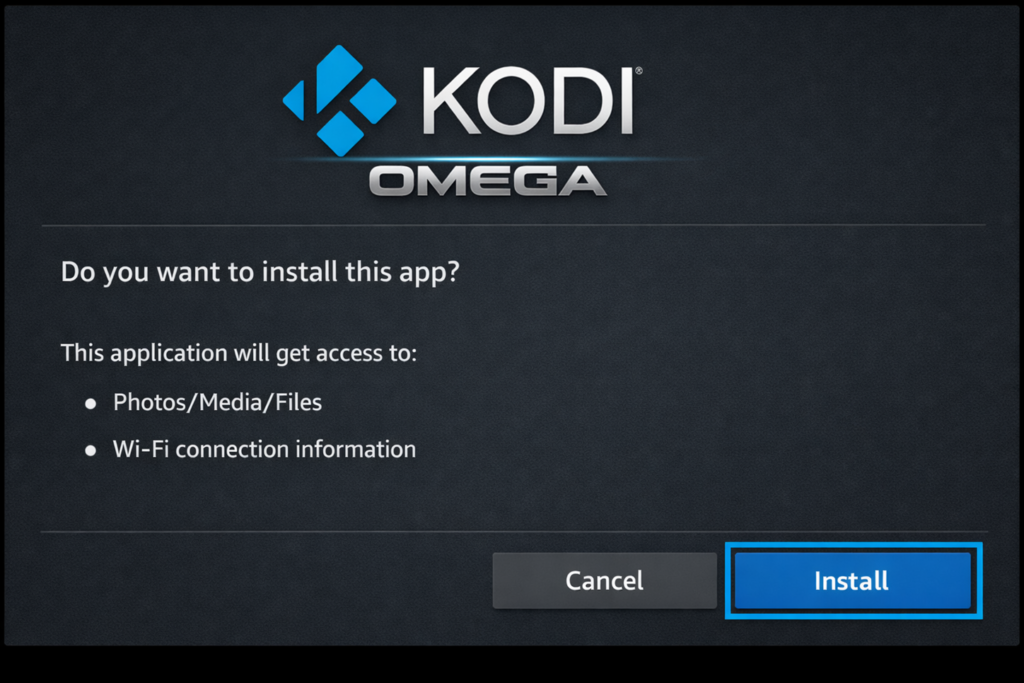
The Downloader app will now begin downloading the Kodi APK. On a decent connection, this usually takes under a minute. Once the download finishes, an installation prompt will automatically appear on your screen.
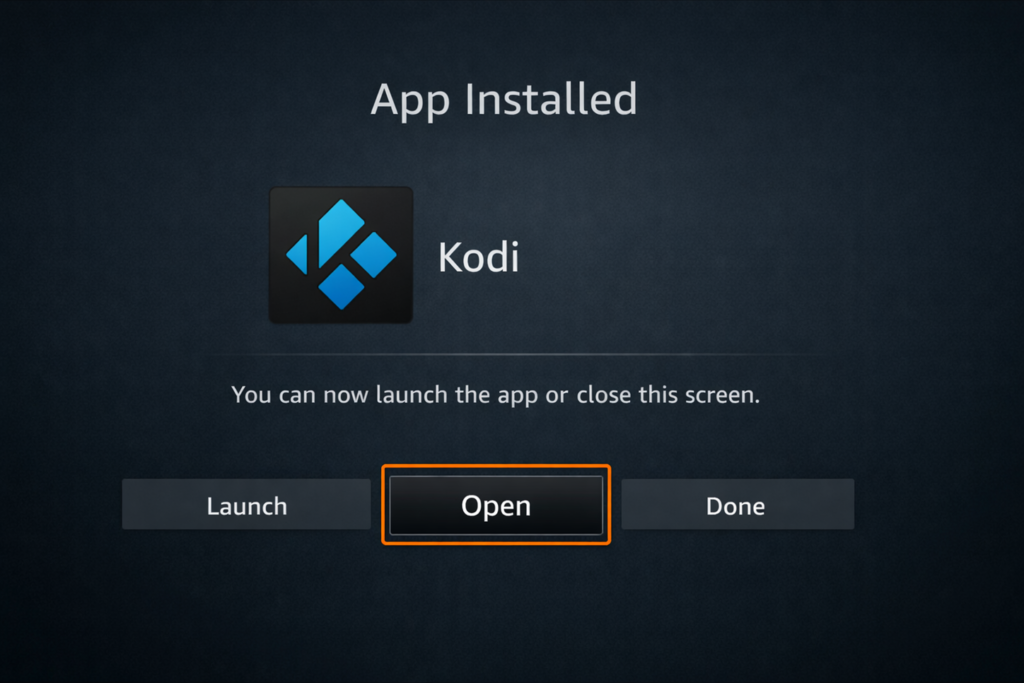
Click Install and wait for the process to complete. You’ll see an “App Installed” confirmation when it’s done.
Step 10: Launch Kodi and Clean Up
Once the App Installed message appears, click Open to launch Kodi for the first time and confirm everything is working.
After you’ve verified Kodi launches correctly, go back to the Downloader app and select Delete on the APK file. There’s no reason to keep the installer taking up precious storage space on your Firestick.
First Run: Initial Setup and Permissions
When you first launch Kodi 21.3 Omega, it goes through a brief initialization process and will immediately ask for some important permissions. Don’t skip these.
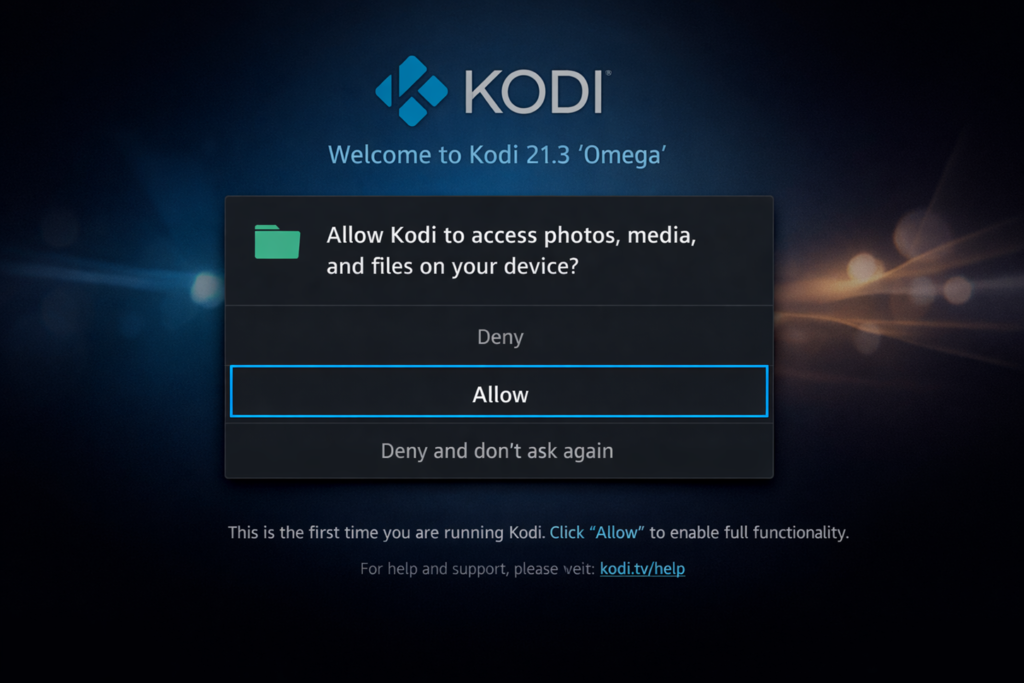
Step 11: Grant Media Permissions
Kodi will display a splash screen as it sets up its database, and then prompt you for permission to access your device’s files and storage. Click Continue and then select Allow.
This permission is non-negotiable — without it, Kodi cannot play any local media files or save your settings and add-on configurations. Make sure you grant it before doing anything else.
💡 Pro Tip: After granting permissions, take a moment to browse the default Estuary skin before installing any add-ons. Getting familiar with the stock interface makes everything easier when you start customizing.
Advanced Setup: Real-Debrid and Trakt Integration
If you want to take Kodi from good to genuinely outstanding, integrating Real-Debrid and Trakt is the single best thing you can do. These two services are what separate a basic Kodi setup from a premium streaming machine.
Why You Need Real-Debrid
Real-Debrid is a multi-hosting service that gives you fast, private, high-quality links for movies and TV shows. Instead of scraping slow, ad-ridden free links that buffer constantly, Real-Debrid gives you access to 4K remux streams that play instantly — zero buffering, maximum quality.
The service costs just a few euros per month and is genuinely worth every cent if you use Kodi regularly.
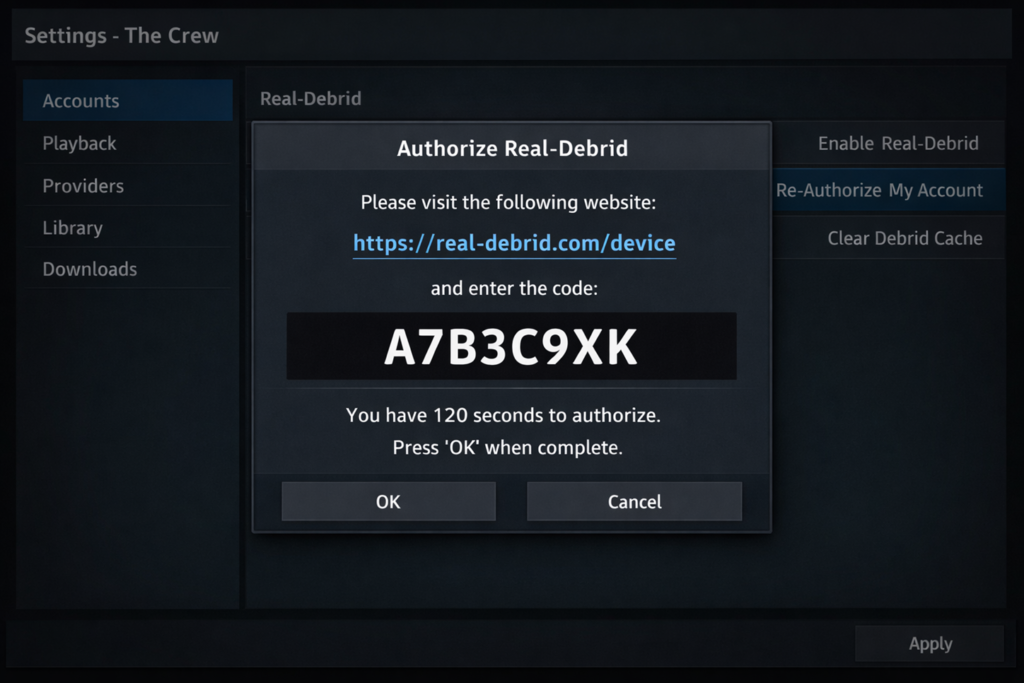
Step 12: Authorize Real-Debrid
- Open your favorite Kodi add-on (The Crew, Seren, or Umbrella are the top picks in 2026).
- Navigate to Settings > Accounts inside the add-on.
- Select Authorize Real-Debrid.
- A unique device code will appear on your TV screen. On your phone or computer, visit https://real-debrid.com/device and enter the code.
- Once authorized, your add-on will automatically use Real-Debrid links for all content.
Why You Need Trakt
Trakt is a free service that automatically tracks everything you watch. Finished half a movie on your Firestick and want to pick it up on your phone? Trakt syncs your progress across every device. It also provides “Up Next” lists, personal watchlists, and detailed watch history statistics.
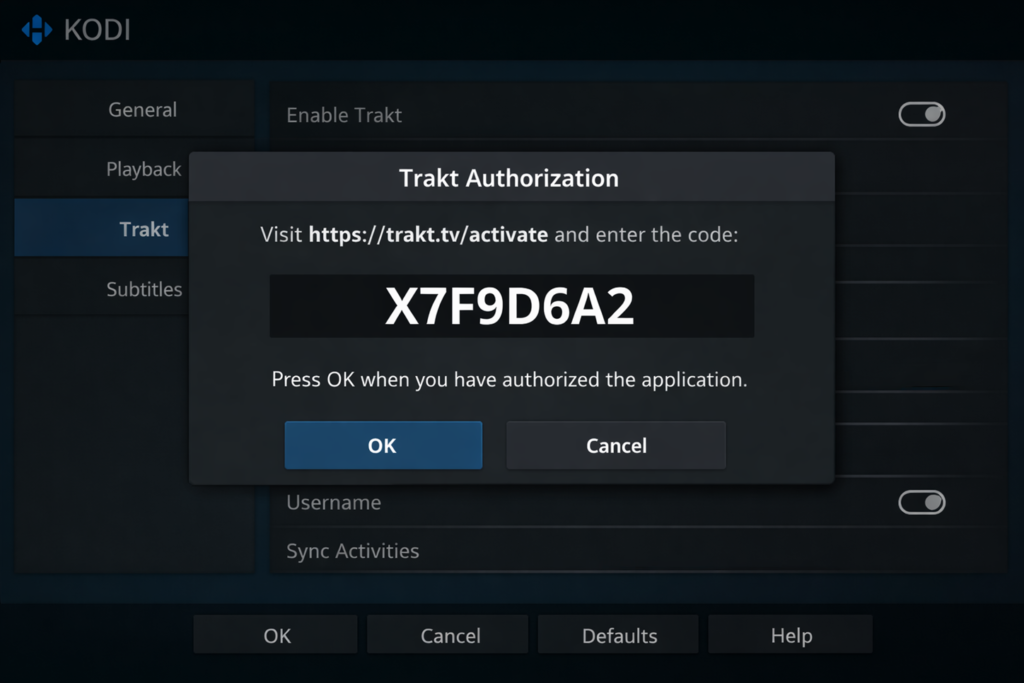
Step 13: Synchronize with Trakt
- In your add-on settings, find the Trakt section.
- Select Authorize.
- Visit https://trakt.tv/, and activate on your phone or computer and enter the code shown on your TV.
- Once linked, Trakt will automatically sync your watch progress and recommendations across all devices.
Pro Maintenance: Keeping Your Firestick Fast
The most common complaint about Kodi on Firestick isn’t about the app itself — it’s about the device getting sluggish over time. The culprit is almost always a bloated cache or excessive thumbnail accumulation. The fix is simple: regular maintenance.
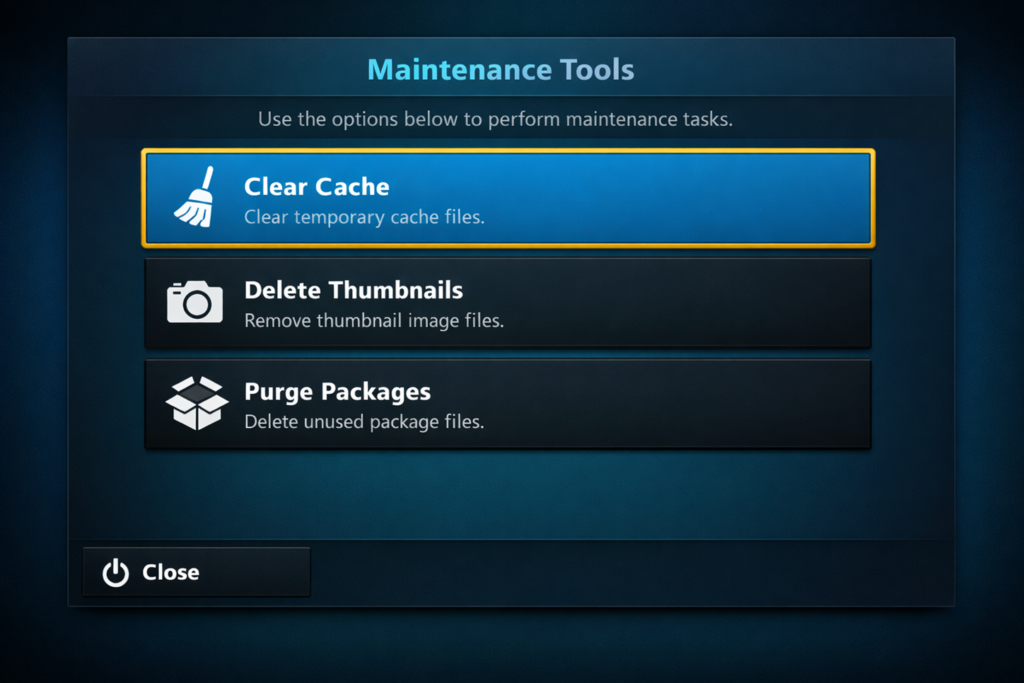
Step 14: Clear Cache and Purge Packages
We recommend using a dedicated maintenance tool. OpenWizard is a great standalone option, and many popular builds include one built-in. Here’s what to do:
- Open your maintenance tool from the Kodi add-on menu.
- Select Clear Cache — this should be done at least weekly if you use Kodi regularly.
- Select Delete Thumbnails if you’re running critically low on storage. Note: this forces Kodi to re-download artwork, which takes a few minutes.
- Select Purge Packages to remove old update files that accumulate in the background.
Clearing Cache via Firestick Settings
You can also clear Kodi’s cache directly through the Firestick settings without opening any maintenance tool:
- Go to Settings > Applications > Manage Installed Applications.
- Find Kodi and select it.
- Click Clear Cache.
⚠️ Warning: Never click “Clear Data” in the Firestick app settings — this will wipe your entire Kodi setup including all add-ons, settings, and configurations. Clear Cache only.
The Best Kodi 21.3 Omega Builds for Firestick (2026)
While building your Kodi setup piece by piece gives you the most control, many users prefer a Kodi Build — a pre-configured version of Kodi that comes with skins, add-ons, and settings already installed. Think of it as a one-click shortcut to a beautiful, fully functional setup.
Here are the top builds we recommend heading into 2026:
1. Xenon Build (2026 Edition)
Xenon has been a fan favorite for years, and for good reason — it’s lightweight, fast, and specifically optimized for Firestick hardware. The clean, horizontal menu system gives it a premium Apple TV-like feel without slowing things down.
- Best For: All-around streaming — movies, TV shows, and live sports
- Key Add-ons Included: The Crew, Seren, and Mad Titan Sports
- Performance: Extremely fast on Firestick 4K and 4K Max
2. Diggz Xenon Free
If you don’t have a Real-Debrid account and want to focus on free streaming links, Diggz Xenon Free is the build for you. It’s slightly heavier than the standard Xenon build but offers excellent variety for budget-conscious cord-cutters.
3. Crew Wizard Builds
The team behind The Crew add-on has their own wizard with several excellent builds. These are known for their reliability and extremely frequent updates — if an add-on stops working, the Crew team is usually the first to patch it.
Why a VPN is Non-Negotiable for Kodi Users
We’re not going to sugarcoat this — if you’re using Kodi with third-party add-ons on a Firestick, you need a VPN. Here’s the plain truth about why:
1. ISP Throttling
Your Internet Service Provider can see that you’re streaming high-bandwidth video from third-party sources. Many ISPs throttle (slow down) that traffic intentionally. A VPN encrypts your data so your ISP can’t see what you’re streaming, meaning you get the full speeds you’re paying for.
2. Privacy and Security
Kodi add-ons are developed by third parties. While the most popular ones are perfectly safe, your IP address is still visible to every server you connect to. A VPN masks your IP address, making your activity untraceable back to your home network.
3. Bypassing Geo-Restrictions
Some content is only accessible in certain countries. Connect to a VPN server in the UK and you can access BBC iPlayer, UK sports streams, and content that would otherwise be blocked in your region.
💡 Pro Tip: We recommend connecting to your VPN before opening Kodi every single time. Make it a habit, not an afterthought.
Pro Settings: Optimizing Kodi 21.3 for Firestick Hardware
Want to squeeze every last bit of performance out of your Firestick? These tweaks make a real, noticeable difference — especially on 4K content:
1. Increase the Video Cache (AdvancedSettings.xml)
By default, Kodi uses only a small amount of RAM for buffering. On a Firestick, this can lead to micro-stutters on high-bitrate 4K files. Increasing the buffer size fixes this.
- Open your maintenance tool (like OpenWizard).
- Navigate to System Tweaks > Advanced Settings.
- Select the Firestick/Android TV preset. This automatically optimizes your buffer size based on your device’s available RAM.
2. Disable Unnecessary Background Services
Kodi runs several background services that most users don’t need. Disabling them frees up resources for the things that matter:
- Go to Settings > Services.
- Disable UPnP / DLNA (unless you’re streaming from a local media server).
- Disable AirPlay (unless you actively cast from an iPhone to Kodi).
- Disable Weather updates to eliminate unnecessary background data usage.
3. Limit the GUI Resolution
Kodi’s interface can run at 4K, but on a Firestick this can make menus feel laggy. Here’s the fix:
- Go to Settings > System > Display.
- Set GUI Resolution to 1080p.
💡 Pro Tip: Setting the GUI to 1080p does NOT affect your video playback. Your 4K movies will still play in full 4K resolution — you’re just making the menus snappier.
Deep Customization: Transforming Kodi with Skins
Not a fan of the default Estuary skin? You have hundreds of options to completely transform how Kodi looks. Here are our top three skin recommendations for 2026:
1. Arctic Zephyr: Resurrection
Arguably the most beautiful skin in the Kodi universe. It features a clean, white-and-grey aesthetic that’s easy on the eyes and mimics the look of premium smart TVs. Perfect for minimalists.
- Pros: Fast, elegant, and highly customizable home screen widgets
- Cons: Can run slightly heavy on older Firestick Lite models
2. AuraMod
Want your Firestick to look exactly like Netflix? AuraMod is your answer. Large posters, horizontal content rows, and when paired with Trakt, it’ll display your “Next Up” episodes right on the home screen.
- Pros: Familiar Netflix-style interface — great for family members
- Cons: Requires a bit of initial setup to get widgets working perfectly
3. Titan Bingie Mod
The ultimate skin for home theater enthusiasts. Auto-playing trailers, detailed actor info, and a massive array of layout options. It’s feature-rich but resource-heavy.
- Pros: Most feature-rich skin available anywhere
- Cons: Very resource-intensive — only recommended for Firestick 4K Max or Fire TV Cube
Safety First: Setting Up Parental Controls
If you have kids in the house, Kodi’s built-in parental control features are easy to set up and genuinely effective. Here’s how to lock things down:
Create a Master Lock
- Go to Settings > Interface > Master Lock.
- Select Master Lock Code and Settings.
- Choose your lock type (numeric PIN or full text password) and set your code.
- You can now choose to lock specific areas — Settings, the Add-on Manager, or particular Media Sources.
Set Up Separate User Profiles
Kodi allows multiple user profiles, similar to how Netflix works. Create a Kids profile with access only to a specific folder of family-friendly content, and a Main profile for everything else.
- Go to Settings > Profiles.
- Select Add Profile and give it a name.
- Configure separate library sources and add-on settings for each profile.
The Ultimate List of Recommended Kodi Add-ons (2026)
Here are the most reliable, high-quality add-ons available for Kodi 21.3 Omega, broken down by category:
Best for Movies & TV Shows
- The Crew: The gold standard for Kodi add-ons. Massive library, updated almost daily, works perfectly with both Real-Debrid and Trakt.
- Seren: Built specifically for Real-Debrid users. Blazing fast with the highest quality 4K links available.
- Umbrella: Lightweight, fast, and extremely reliable with Real-Debrid and Trakt integration.
- Magic Dragon: Excellent for finding the latest releases and high-quality 4K content.
Best for Live TV & Sports
- Mad Titan Sports: The best add-on for live sports — NFL, NBA, MLB, international soccer, and more.
- The Loop: Excellent for live sports streams and post-game replays.
- DaddyLive: Hundreds of live TV channels from around the world, reliably maintained.
- Rising Tides: Great for live sports events and pay-per-view matches.
Best for Kids & Family
- Kids Section (The Crew): The Crew has a dedicated family section with cartoons and kid-friendly movies.
- YouTube: The official YouTube add-on is invaluable for educational content and safe kids’ creators.
- Pluto TV: Several free 24/7 channels dedicated to kids’ shows and classic cartoons.
Troubleshooting Common Kodi Issues
Even with a clean installation, things can go wrong. Here are the most common issues Firestick users encounter and exactly how to fix them:
Issue 1: Black Screen on Launch
A black screen that leads to a crash is almost always a cache issue. Here’s the fix:
- Go to Firestick Settings > Applications > Manage Installed Applications > Kodi.
- Select Force Stop, then Clear Cache.
- Relaunch Kodi. Do NOT click Clear Data — this will erase your entire setup.
Issue 2: Kodi Won’t Launch or Keeps Crashing
- Clear the Kodi cache (see above) — this resolves the majority of launching issues.
- Restart your Firestick: Settings > My Fire TV > Restart. A quick restart can fix temporary software glitches.
- If problems persist, uninstall Kodi completely and perform a fresh installation following this guide from Step 5.
Issue 3: Buffering on 4K Streams
Even with a fast internet connection, Firesticks can struggle with buffering. Common culprits:
- Switch to the 5GHz band on your Wi-Fi router for better throughput and less interference.
- Use an Ethernet Adapter for the most stable, consistent connection possible.
- Enable Real-Debrid to bypass server-side congestion that causes free links to buffer.
- Increase your video cache using the AdvancedSettings.xml tweak described in the Pro Settings section.
Issue 4: Low Storage Warning
Kodi’s thumbnail cache can grow surprisingly large over time. Manage it proactively:
- Use a maintenance add-on (OpenWizard is a great option) to Clear Cache and Purge Packages weekly.
- Delete the Thumbnails folder and Textures13.db file using a file manager app like X-plore if the cache becomes unmanageable.
- Uninstall any Kodi add-ons or builds you no longer use — they accumulate data in the background.
Issue 5: “No Streams Available” Error
This usually means your add-on is outdated or your scrapers have stopped working. Check for updates in the Kodi repository or re-authorize your Real-Debrid account. If that doesn’t resolve it, switch to a backup add-on like The Crew or Seren.
Feature Comparison: Kodi 21.3 Omega vs. Competitors
Wondering how Kodi stacks up against other popular streaming solutions? Here’s an honest breakdown:
| Feature | Kodi 21.3 Omega | Stremio | Plex |
| Customization | Extremely High (Skins/Builds) | Low (Static Interface) | Medium (Layout options) |
| Add-on Library | Massive (Thousands) | Moderate | N/A (Official only) |
| Local Media | Excellent | Poor | Best in Class |
| Offline Play | Fully Supported | Limited | Requires Subscription |
| HDR / Dolby Vision | Full Support | Moderate | Full Support |
| Cost | 100% Free | Free / Plus tier | Free / Pass required |
| Firestick Optimization | Excellent | Good | Good |
FAQs
Is Kodi legal?
Yes — Kodi itself is 100% legal. It’s an open-source media player that you’re free to download and use. However, using Kodi with add-ons to stream copyrighted content without authorization is illegal. Always use official, legal add-ons, and when in doubt, use a VPN.
Will Kodi slow down my Firestick?
Not if you manage it properly. A clean installation of Kodi 21.3 Omega with 2–3 quality add-ons will run perfectly on any modern Firestick. The problems start when users install heavy builds with dozens of add-ons and never clear their cache. Regular maintenance is key.
Can I install Kodi on a Fire TV Cube?
Absolutely. The Fire TV Cube, Fire TV televisions, and the Firestick Lite all follow the exact same installation process outlined in this guide.
Why is my Kodi add-on not working?
Add-ons frequently go down for maintenance or are removed by their developers. If an add-on stops working, check the developer’s official Telegram or Reddit for updates. In the meantime, switch to a reliable backup like The Crew or Seren.
Do I need Real-Debrid to use Kodi?
No, but it makes a massive difference in stream quality. Free links often buffer, go down, or serve lower quality video. Real-Debrid provides consistent, high-speed 4K streams for a small monthly fee. We strongly recommend it for regular Kodi users.
Summary Checklist: Your Perfect Kodi Setup
Use this checklist to confirm you’ve completed every step for a fully optimized Kodi experience:
- Update Firestick Firmware: Ensure your device is on the latest Fire OS.
- Enable Developer Options: The 7-click method on My Fire TV > About.
- Install Downloader App: Your gateway to sideloading Kodi.
- Install Kodi 21.3 Omega: Use the official ARM 64-bit (ARMV8A) version.
- Grant Permissions: Allow file access on first launch.
- Enable a VPN: Protect your privacy and prevent ISP throttling.
- Integrate Real-Debrid: Unlock premium, buffer-free 4K streaming links.
- Sync with Trakt: Never lose your place in a series again.
- Install Your Preferred Build or Add-ons: The Crew, Seren, Umbrella, and Mad Titan Sports are our top picks.
- Set Up Parental Controls (if needed): Profiles and Master Lock are your friends.
- Perform Regular Maintenance: Clear your cache at least once a week.
Final Thoughts
Installing Kodi 21.3 Omega on your Firestick isn’t just a technical task — it’s an investment in a better home entertainment experience. By following this guide, you haven’t just installed an app. You’ve built a professional-grade streaming machine that rivals any cable or satellite subscription on the market.
With Real-Debrid delivering buffer-free 4K streams, Trakt keeping your watch progress synced across every device, a custom skin making your interface look exactly the way you want, and a maintenance routine keeping everything running smoothly — you’ve got a setup that most streaming enthusiasts spend months piecing together.
The world of Kodi is always evolving. Stay current by checking for new stable releases at kodi.tv, keep your favorite add-ons updated, and explore the community — there’s always something new worth discovering.
🎬 Happy Streaming from the FirestickTVStream Team!