

Key Takeaway: You can watch Netflix on Kodi using the unofficial CastagnaIT addon, which installs from the CastagnaIT repository and plays your own paid Netflix account through InputStream Adaptive and Widevine DRM. It works on Kodi 21.3 Omega and Firestick, but streams cap around standard definition, so set expectations before you start.
Adding Netflix to Kodi puts your subscription right beside your other addons, so you never leave the app to switch between them. Setup is more involved than a normal addon because of the DRM Netflix requires, so I have written every step out clearly.
I installed the Netflix addon fresh on a Fire TV Stick 4K Max running Kodi 21.3 Omega, signed in with a paid Netflix account, and worked through the Widevine setup before writing this guide. Everything below reflects what actually happened on real hardware, including the resolution limits and the fixes for the errors I hit.
How to Install Netflix on Kodi (Step by Step)
Installing Netflix on Kodi happens in four stages: enable unknown sources, add the CastagnaIT repository, install the Netflix addon, then sign in and let it set up Widevine. Follow each part in order and the whole process takes around ten minutes.
Part 1: Enable Unknown Sources
- Open Kodi and go to the Settings cog, then choose System from the settings menu.
- Select Add-ons in the left-hand panel of the System settings screen.
- Toggle Unknown Sources to on, then accept the warning that Kodi displays.
- This allows Kodi to install the third-party CastagnaIT repository in the next part.
Part 2: Add the CastagnaIT Repository
- Go to Settings, then File Manager, and double-click Add Source.
- Select the None box and type the CastagnaIT repository URL exactly as written.
- Name the source castagnait so it is easy to recognise, then select OK.
- Return to the home screen once the source has been saved successfully.
Part 3: Install the Netflix Addon
- Open Add-ons from the main menu and click the package installer box icon.
- Choose Install from Zip File, then select the castagnait source you just added.
- Install the CastagnaIT repository and wait for the confirmation notification to appear.
- Choose Install from Repository, open CastagnaIT Repository, then Video Add-ons, and install Netflix.
Part 4: Sign In and Install Widevine
- Launch the Netflix addon and enter your paid Netflix email and password when prompted.
- Accept the prompt to install InputStream Adaptive and Widevine DRM if it appears.
- Let Kodi download the Chrome OS image to extract Widevine, keeping 3.1 GB free.
- Once Widevine finishes installing, pick a profile and play a title to confirm it works.
What Is the Netflix Kodi Addon?
The Netflix Kodi addon is an unofficial, community-built plugin that lets Kodi play your own Netflix subscription. It is not made by Netflix, and it relies on the same DRM technology that browsers and official apps use to stream protected content.
- Community Project: The addon, plugin.video.netflix, is maintained by developer CastagnaIT and a community of contributors, entirely separate from Netflix’s own official applications.
- Your Own Account: It streams your existing paid Netflix subscription, so you still log in with your normal email and password rather than accessing anything for free.
- InputStream Based: It uses InputStream Adaptive, Kodi’s adaptive-streaming engine, to handle Netflix’s protected video the same way a web browser handles it under the hood.
- Widevine Required: Because Netflix content is encrypted, the addon needs Google’s Widevine DRM module installed before it can decrypt and play any of your shows.
- Kodi Integration: Once set up, Netflix appears beside your other addons with browsing, search, and profiles, so your subscription lives inside the same interface as everything else.
Is Watching Netflix on Kodi Legal?
This is the first thing worth clearing up, because the Netflix addon is different from grey-area streaming addons. You are watching content you already pay for, which changes the picture considerably.
- Licensed Content: You stream your own paid Netflix subscription, so the content itself is fully licensed to you, unlike unlicensed third-party streaming addons.
- Unofficial Tool: The addon is not made or endorsed by Netflix and technically falls outside its terms of service, even though the underlying account is legitimate.
- Low Practical Risk: Because you are simply accessing your own subscription through a different app, the real-world risk is minimal compared with piracy-focused addons.
- No VPN Needed: Since the content is licensed to your account, you do not need a VPN for legality, and one can actually trigger Netflix’s proxy detection.
- Respect the Terms: Keep your account details private and avoid sharing them, as account sharing rather than the addon itself is what Netflix actively polices.
What You Need Before You Start
Getting these essentials in place first makes the Netflix install go smoothly. The DRM setup in particular needs some free storage, so it is worth checking everything before you begin.
- A Paid Netflix Plan: You need an active, paid Netflix subscription, since the addon streams your own account and cannot access any content without valid login details.
- Kodi 21.3 Omega: Run the current stable Kodi build for the best InputStream and Widevine compatibility, since older versions can cause DRM setup to fail.
- 3.1 GB Free Space: Keep at least 3.1 gigabytes free, because Widevine is extracted from a downloaded Chrome OS recovery image during the addon’s first-run setup.
- A Stable Connection: Aim for at least ten megabits down for smooth playback, as Netflix adjusts quality to your connection just as it does in the official app.
- Patience for Setup: The Widevine download and extraction can take several minutes on a Firestick, so allow time rather than assuming the addon has frozen.
| Requirement | Why It Matters | Notes |
|---|---|---|
| Paid Netflix account | Addon streams your subscription | Required |
| Kodi 21.3 Omega | Best DRM compatibility | Free |
| 3.1 GB free storage | Widevine extraction | One-time setup |
| 10+ Mbps connection | Smooth playback | Recommended |
| InputStream Adaptive | Handles protected video | Bundled with Kodi |
Which Devices Support Netflix on Kodi?
The Netflix addon runs on most Kodi platforms, but the experience varies by device, mainly because of how each one handles Widevine. Here is where it works best and where to expect friction.
- Firestick and Fire TV: Amazon devices run the addon well through Kodi 21.3 Omega, though Widevine extraction is slower on the cheapest sticks with limited storage.
- Android Devices: Android phones, tablets, and TV boxes handle the addon smoothly and usually already have a compatible Widevine module available for the setup.
- Windows and Linux: Desktop Kodi installs work reliably, and their extra storage and power make the Widevine download and extraction step noticeably faster.
- LibreELEC and CoreELEC: These dedicated Kodi operating systems support the addon, and CoreELEC on capable boxes is a popular choice among serious Kodi users.
- Getting Started: New to installing streaming apps on Fire TV? Our Firestick setup walkthrough covers the basics before you tackle Kodi addons.
How to Install Widevine DRM for Netflix
Widevine is the piece that trips up most people, so it deserves its own explanation. It is the DRM module that decrypts Netflix video, and the addon installs it for you if you let it.
- Automatic Prompt: On first launch the addon usually offers to install InputStream Adaptive and Widevine automatically, and accepting this prompt is the easiest route.
- Chrome OS Image: Widevine is extracted from a Chrome OS recovery image the addon downloads, which is why the setup needs 3.1 gigabytes of free space.
- Extraction Time: The download and extraction can take several minutes on lower-powered devices, so let it finish rather than restarting Kodi midway through.
- Manual Fallback: If the automatic step fails, the addon settings include a Widevine installer under InputStream Adaptive settings that you can run manually.
- Confirm Success: Once Widevine is installed, playing any title without a DRM error message confirms the module is working and correctly linked to the addon.
Why Netflix on Kodi Is Stuck in Standard Definition
This surprises many first-time users, so it is best addressed head on. The Netflix addon almost always plays in standard definition, and understanding why prevents a lot of frustration.
- Widevine L3: Kodi uses the software-based Widevine L3 security level, which Netflix limits to standard definition, unlike the hardware L1 used by official apps.
- No Easy HD: Because most Kodi devices cannot provide L1 security, there is no simple switch to unlock full high definition through the addon itself.
- Expect 540p: In practice streams usually top out around 540p, which is watchable but noticeably softer than the crisp HD of the official Netflix app.
- Not a Fault: This limit is by design from Netflix’s DRM, not a bug in the addon, so no amount of reinstalling will raise it to HD.
- The Trade-Off: You gain Netflix inside Kodi’s unified interface, but you accept lower resolution as the price of using an unofficial addon for a protected service.
How to Improve Netflix Streaming Quality on Kodi
While full HD is off the table, a few tweaks help you get the best possible picture from the Netflix addon. None of these break the DRM rules; they simply optimise what is available.
- Force Best L3: In the addon settings, set the video quality to the highest available option so Kodi always requests the best stream L3 permits.
- Wired Connection: Using ethernet or a strong five-gigahertz Wi-Fi signal keeps the stream at its ceiling instead of dropping quality on an unstable connection.
- Close Background Apps: Freeing memory on a Firestick helps playback stay smooth, since low-power devices juggle DRM decoding and video decoding at the same time.
- Update the Addon: Newer addon releases sometimes improve stream handling, so keeping the CastagnaIT repository installed ensures you run the latest quality tweaks.
- Match Your Screen: Setting Kodi’s display resolution sensibly avoids upscaling artefacts, so a clean 540p stream looks as good as it can on a big television.
Netflix Kodi Addon Not Working? Common Fixes
Because it relies on DRM, the Netflix addon has a few failure points the average addon does not. Working through these fixes in order resolves the vast majority of problems.
- DRM Error on Play: A Widevine error usually means the module failed to install, so rerun the Widevine installer in the InputStream Adaptive settings.
- Login Rejected: If sign-in fails, double-check your Netflix email and password in a browser first, since the addon simply passes your real credentials through.
- Blank or Black Screen: A black screen with audio often points to an InputStream Adaptive issue, so update or reinstall it before touching anything else.
- Proxy Error: If Netflix reports a proxy problem, disconnect any VPN, as Netflix actively blocks many VPN servers even for legitimate account holders.
- Addon Won’t Load: Persistent crashes are usually fixed by reinstalling the addon from the CastagnaIT repository on a clean Kodi 21.3 Omega build.
| Symptom | Likely Cause | Fix |
|---|---|---|
| DRM / Widevine error | Widevine not installed | Rerun Widevine installer in settings |
| Login fails | Wrong credentials | Verify login in a browser first |
| Black screen, has audio | InputStream Adaptive issue | Update or reinstall InputStream |
| Proxy error | VPN blocked by Netflix | Disconnect the VPN |
How to Log In and Switch Netflix Profiles
Once installed, the addon behaves much like the official app for accounts and profiles. Knowing where these controls live makes day-to-day use simple for the whole household.
- First Sign-In: On first launch you enter your Netflix email and password once, and the addon stores the session so you do not repeat it each time.
- Profile Selection: After signing in, the addon shows your account’s profiles, so each household member can pick their own personalised rows and watch history.
- Switching Profiles: You can change profile from the addon’s main menu at any time, which keeps recommendations and continue-watching lists separate per person.
- Kids Profiles: Selecting a child profile applies the same maturity restrictions as the official app, so younger viewers only see age-appropriate content.
- Signing Out: The addon settings include a sign-out option, useful if you need to switch accounts entirely or clear stored credentials from a shared device.
Do You Need a VPN for Netflix on Kodi?
VPN advice for the Netflix addon is the opposite of most Kodi guides, so it is worth being clear. Because you use a licensed account, a VPN is usually unnecessary and can cause problems.
- Not Needed for Legality: You stream your own paid subscription, so there is no grey-area activity to hide, and a VPN adds nothing on the legal side here.
- Proxy Detection: Netflix actively blocks many VPN servers, so leaving one connected often triggers a proxy error that stops playback entirely until you disconnect.
- Region Locking: A VPN changes your apparent country and therefore your Netflix catalog, which can confuse the addon and remove titles you expect to see.
- When It Helps: The only real reason to use one is deliberately accessing another region’s catalog, and even then results with the addon are inconsistent.
- My Recommendation: For everyday viewing, leave the VPN off for Netflix and reserve it for the grey-area addons where privacy genuinely matters.
How to Update the Netflix Kodi Addon
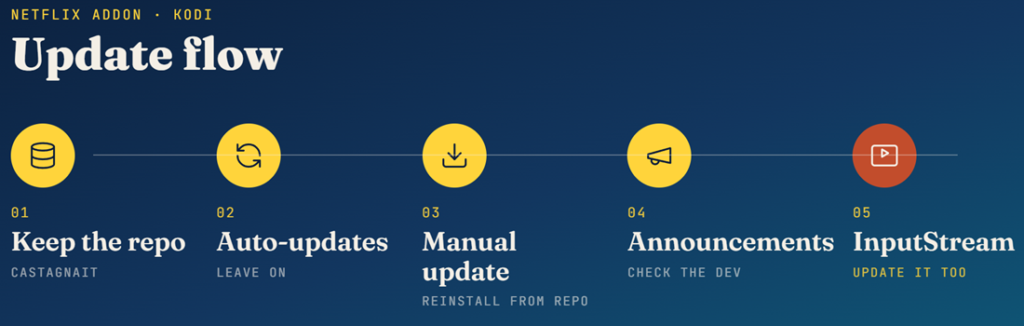
Keeping the addon current matters more than usual, because Netflix changes its systems often and updates keep the addon working. Fortunately, updating is straightforward once the repository is installed.
- Keep the Repo: Leaving the CastagnaIT repository installed lets Kodi apply addon updates automatically, so avoid removing it after your first install.
- Enable Auto-Updates: In the addon’s Kodi settings, leaving automatic updates on ensures fixes for Netflix’s frequent backend changes arrive without manual effort.
- Manual Update: You can force an update by reinstalling from the repository, which is worth doing if playback suddenly breaks after working fine.
- Watch for Announcements: The developer posts updates when Netflix makes major changes, so checking occasionally helps you stay ahead of avoidable breakage.
- Update InputStream Too: InputStream Adaptive updates alongside Kodi, and keeping it current is just as important as updating the Netflix addon itself.
Netflix Kodi Addon vs. the Official Netflix App
It is worth being honest about when the addon makes sense and when the official app is simply better. Each has clear strengths depending on what you value most.
- Resolution: The official app streams full HD and 4K, while the Kodi addon caps around standard definition due to its software-level DRM.
- Integration: The addon’s advantage is living inside Kodi beside your other content, so you never switch apps to move between Netflix and everything else.
- Stability: The official app is more stable and rarely breaks, whereas the addon occasionally needs fixes when Netflix changes its backend systems.
- Device Fit: On a Firestick the official app is effortless, so the addon mainly appeals to dedicated Kodi setups on boxes without a native Netflix app.
- Best of Both: Many users keep the official app for HD viewing and use the addon only for the convenience of a single unified Kodi interface.
How Widevine and InputStream Adaptive Work Together
Understanding the two pieces behind the addon helps you troubleshoot it confidently. They work as a pair, and knowing their roles makes error messages far less mysterious.
- InputStream Adaptive: This Kodi component handles adaptive streaming, requesting and assembling the video segments Netflix serves, much like a web browser does.
- Widevine’s Role: Widevine is the DRM module that decrypts those protected segments, without which InputStream receives only scrambled, unplayable data from Netflix.
- The Handoff: The addon tells InputStream how to talk to Netflix, InputStream fetches the stream, and Widevine decrypts it so Kodi can finally display it.
- Why Both Fail Together: If either piece is missing or outdated, playback breaks, which is why most fixes involve reinstalling or updating one of the two.
- Security Levels: Widevine’s L3 software level is what the pair uses on Kodi, and that level is exactly what caps your Netflix resolution at standard definition.
Best Alternatives to the Netflix Kodi Addon
The addon is not the only way to watch Netflix, and for many people a simpler route is better. These alternatives cover the main options if the addon’s limits do not suit you.
- Official Netflix App: On Firestick and Android the official app streams full HD and 4K reliably, and it is the best choice when picture quality is your priority.
- Netflix in a Browser: On a Windows or Linux Kodi box, watching Netflix in a web browser is simple and delivers better resolution than the addon.
- Prime Video Addon: If you want another subscription inside Kodi, the community Amazon VOD addon adds Prime Video in a similar InputStream-based way.
- Plex or Jellyfin: For your own media library beside streaming, Plex and Jellyfin integrate cleanly with Kodi and avoid DRM limits entirely for personal files.
- All-in-One Addons: For everything else, our roundup of the best Kodi addons covers strong tools for movies and TV beyond Netflix.
Tips to Get the Best Netflix Experience on Kodi
A few habits keep the Netflix addon running smoothly over the long term. These small steps prevent most of the common headaches before they ever start.
- Keep It Updated: Apply addon and InputStream updates promptly, since Netflix’s frequent backend changes are the leading cause of the addon suddenly breaking.
- Maintain Free Space: Leave storage headroom on your device so Widevine and cache data have room, which prevents playback stalls on smaller Fire TV sticks.
- Skip the VPN: Leave your VPN off for Netflix to avoid proxy errors, and switch it on only for the grey-area addons where privacy genuinely matters.
- Use Profiles: Set up individual profiles so recommendations stay accurate, which makes the addon far more pleasant for a household sharing one account.
- Have a Backup Plan: Keep the official app installed too, so you can fall back to HD viewing whenever the addon needs a fix after a Netflix change.
How to Enable Subtitles and Audio Tracks on Netflix
Netflix carries subtitles and multiple audio languages, and the Kodi addon exposes them just like the official app. Knowing where the controls sit makes multilingual viewing effortless for the whole household.
- During Playback: Open the on-screen playback menu while a title plays, and you will find the subtitle and audio options exactly where Kodi keeps them for any video.
- Language Choice: Netflix serves whatever subtitle and dubbed audio languages it holds for each title, so availability depends on the show rather than any limitation in the addon.
- Default Preferences: Setting your preferred subtitle and audio language in Kodi’s settings means the addon applies them automatically to each new title you open.
- Subtitle Styling: Kodi lets you resize and recolour subtitles independently of Netflix, which helps when the default text is hard to read on a large television.
- Fixing Sync: If subtitles drift out of time, adjusting the subtitle offset in the playback menu realigns them without needing to restart the whole stream.
How to Reduce Buffering on the Netflix Addon
Buffering on the Netflix addon usually comes down to your connection or device load rather than Netflix itself. A few adjustments keep playback smooth even on a modest Firestick.
- Check Your Speed: Run a quick speed test on the device, since Netflix needs a steady connection and buffering almost always traces back to weak or unstable bandwidth.
- Prefer Wired: An ethernet adapter or a strong five-gigahertz Wi-Fi signal holds the stream far better than a distant, congested connection on a Firestick.
- Free Up Memory: Closing background apps and rebooting the device clears memory, which helps low-power sticks handle DRM decoding and video playback at the same time.
- Lower the Ceiling: If buffering persists, capping the stream quality in the addon settings trades a little sharpness for a picture that plays without constant interruption.
- Update Everything: Outdated InputStream Adaptive or addon versions can stutter, so keeping both current often resolves buffering that appears right after a Netflix change.
How to Uninstall or Reset the Netflix Addon
Sometimes the cleanest fix is a fresh start. Removing and reinstalling the Netflix addon clears stubborn errors, and knowing how avoids disturbing the rest of your Kodi setup.
- Remove the Addon: In Add-ons, open the Netflix addon, choose Uninstall, and confirm, which clears its stored data while leaving the rest of Kodi completely untouched.
- Keep the Repo: Leave the CastagnaIT repository installed so you can reinstall quickly, since removing it means adding the source all over again from scratch.
- Reset Settings Only: If you would rather not fully uninstall, resetting the addon’s settings to default often clears misconfigured options without a complete reinstall.
- Reinstall Cleanly: Reinstall from the CastagnaIT repository, sign back in, and let Widevine set up again, which resolves most persistent playback and login failures.
- Note Your Tweaks: Recording your Kodi adjustments before a big reset means you can restore your preferred settings quickly once the Netflix addon is working again.
Conclusion
Watching Netflix on Kodi is genuinely useful if you want your subscription inside one unified interface, and the CastagnaIT addon makes it possible on Kodi 21.3 Omega and Firestick. Just go in knowing the trade-off: setup takes patience and streams cap around standard definition because of Widevine L3. Keep the addon and InputStream updated, leave your VPN off for Netflix, and keep the official app handy for the times you want full HD. Set up that way, the addon is a reliable, convenient part of a well-rounded Kodi build.
Netflix on Kodi FAQs
Can you watch Netflix on Kodi?
Yes. The unofficial CastagnaIT Netflix addon lets Kodi stream your own paid Netflix account using InputStream Adaptive and Widevine DRM. It works on Kodi 21.3 Omega, Firestick, Android, Windows, and Linux.
Is the Netflix Kodi addon free?
The addon is free to install, but it streams your existing paid Netflix subscription. You still need an active Netflix plan and your normal login; nothing is unlocked for free.
Why is Netflix on Kodi only standard definition?
Kodi uses Widevine L3 software DRM, which Netflix limits to standard definition. Full HD needs hardware-level L1 that most Kodi devices cannot provide, so streams usually cap around 540p.
Do I need a VPN for Netflix on Kodi?
No. You stream a licensed account, so a VPN adds nothing for legality and can trigger Netflix’s proxy error. Leave it off for Netflix and use it only for grey-area addons.
Is watching Netflix on Kodi legal?
You are streaming your own paid subscription, so the content is licensed to you. The addon is unofficial and outside Netflix’s terms, but the practical risk is low compared with piracy addons.
Why does the Netflix addon need 3.1 GB free?
The addon extracts Widevine DRM from a downloaded Chrome OS recovery image, which needs about 3.1 gigabytes of temporary free space during the one-time first-run setup.
Why is my Netflix Kodi addon not working?
Common causes are a missing Widevine module, outdated InputStream Adaptive, wrong login details, or an active VPN. Rerun the Widevine installer, update InputStream, verify your login, and disconnect any VPN.
Does the Netflix addon work on Firestick?
Yes. It installs and runs on Amazon Firestick and Fire TV through Kodi 21.3 Omega, though Widevine extraction is slower on cheaper sticks with limited storage.